

We are often asked “How can I frame a print by myself?” or whether it’s possible at all to do it DIY. Although we recommend going to a professional framer, it is possible to frame your own prints or any artwork on paper.
In this article we will explain how to frame a print by yourself. Are you still looking for your perfect artwork? We wrote an entire post to help you buy art, which you should check out first.
Framing properly is one of the most effective ways to preserve and care for art on paper. So it should be done correctly and carefully.
By the end, you should know which materials you need, to mat or not to mat and the exact steps to frame your art. Let’s get started!
Materials to use
- Frame, including glass
- Artwork
- Acid-free mat board
- Precision knife/X-Acto knife
- Metal ruler
- Acid-free artist tape
- Microfiber cloth
- Optional: acrylic spacers
- Optional: glass cleaner/water and dish soap
To mat or not to mat?
You probably have noticed before that many pieces of framed artwork have a sort of card “border” around the artwork. This is called a mat, sometimes also called a passe-partout.

It’s basically card paper with a cutout through which the art is displayed. The cutout is called an “aperture”.
A mat gives some breathing space between the art and the frame itself.
The opposite of having a mat is to frame an artwork ‘full-bleed’, meaning the art goes all the way to the frame’s edge.
In general, a mat gives extra wall space and emphasis for small pieces. The mat around a smaller artwork can be quite large in proportion.
Larger artworks and pieces with a built-in border often look better full-bleed. A mat could work for large pieces as well though, but we recommend a narrower mat in proportion to the art.
To use a mat or not is often about personal taste.
For art preservation, it is better to frame paper-based art using a mat or spacers. If a print has direct contact with the glass, it can adhere to it over time. The mat/spacer provides a barrier so the artwork can’t touch the glass on the frame.
Size of the frame
Depending on whether you want a mat or not, you can now decide the size of your frame. You could order a special-sized frame, get one from a home décor store or may find one in a local thrift shop.
Should you want to add a mat, your frame should obviously be wider and longer than your print. Most people go for a mat of around 5 cm (2 inches), but anywhere between 5-15 cm (2-6 inches) would work.
Add the mat size to the size of the work - don’t forget that the mat extends on all 4 sides of the work, so 5 cm of whitespace adds 10cm to the total width/length - et voilà, that’s your frame size.
Type of glass
Next up, it’s time to choose what glass to use - if any - to protect your newly acquired art piece.

You have a few different ways to go about this, depending on the size of your print, your budget and where you’ll be hanging the art piece.
No glass
The first option would be not using any glass protection in the frame. Depending on the style of frame you’re using, this might be the most aesthetically pleasing option.
Without glass, you’ll be able to see the art piece and its texture up close and there are no reflections that might distort your viewing experience.
When taking into account cost, not using any glass is obviously also the cheapest option.
There are a few downsides to not using any glass though. Since the art piece is exposed, grime and filth will adhere to the piece more easily over time.
There is also an increased risk of damaging the artwork by accidentally touching it or brushing against it when walking by for example.
Lastly, UV radiation from sunlight will deteriorate the paper and inks over time, causing the art piece to discolor and fade. You can slow this process down by choosing the right spot to hang the work.
Plexiglass
Plexiglass or acrylic has come a long way over the last 1-2 decades and tends to be the industry standard by now. It has several benefits:
Plexiglass is often more clear than regular glass, which can have a green tint.
Plexiglass is relatively light in weight, compared to glass, making it more cost-effective to ship as well as more suitable for large frames.
Plexiglass doesn’t break as easily as glass.
There are several UV-protectant coatings available, which protect art.
Glare-free plexiglass provides a good viewing experience from all angles.
However, there are some disadvantages to plexiglass to keep in mind as well.
Although plexiglass is hard to break, it does scratch easily. Therefore, it also requires special care when cleaning: never use paper towels, but only microfibre cloths to clean acrylic glazing.
Glass
Glass is fragile and heavy, but generally at less risk of scratching and much easier to clean than plexiglass.
Not all glass is created equal. The most commonly used glass for inexpensive, off the shelf, ready-made frames does not provide any UV protection and often has a greenish tint, which can affect the viewing experience.
Perfectly clear glass is available as a “high-end” material, also referred to as museum glass.
Museum glass
Museum glass provides one of the clearest and non-reflective views of the artwork underneath. UV-protective coatings are often a standard in museum glass, providing a great protection for the art.
How to frame a print
Now you have your frame and optionally a mat board, it is time to start framing your print.
1. Open up your frame
A frame usually consists of glass, a paper insert, (pre-cut) mat board, backing board and sometimes a layer of brown kraft paper.

If there’s brown paper at the back of your frame (often the case with vintage frames), you can remove it by cutting along the inside edge of the frame.
Next up is the backing board, often held in place by metal clasps, staples or even nails. Take it out carefully. The paper insert behind the backing board can be thrown away.
Your frame may come with a pre-cut mat board, a full mat board, or no mat board at all. After this layer is the glass. It could be actual glass or plexiglass.
Put all layers carefully away.
2. Position your print
With a pre-cut mat:
Place the mat face down on a table. Lay your print over the aperture, also face down. Using your acid-free tape, cut 4 small pieces to tape down the corners. Hold up the mat and print to see if the art is sitting straight. If not, simply re-adjust and re-stick carefully.

If you’re cutting your own mat:
Start off by centering your art on the mat board. A general rule is to center the art horizontally, while vertically offsetting it just a little bit, by keeping slightly more white space at the bottom then at the top. This visually balances the artpiece and avoids it looking top-heavy.
When you’re satisfied with the position, mark the art’s dimensions on the mat. Cut out the opening with a precision knife/X-Acto knife along a metal ruler.
After creating the aperture, place the print face-down along the back of the mat. Secure it with a few strips of acid-free tape.
If you’re framing full-bleed:
Place acrylic spacers around the inside of the frame or attach them to the glass directly. Acrylic spacers are thin, transparent sticks that stick to the sides of your frame. They create a gap between your print and the glass, so the art won’t touch the glass.
Your artwork should be mounted before you place it in the frame. This simply means the art is attached to a semi-rigid or rigid material. You could mount it yourself or have the art professionally mounted. Always make sure the adhesive and the board are acid-free.
Before we place all the layers back in the frame, it’s time to…
3. Clean the glass
The inner side of the glass should be clean and dust-free for a clear display of the art.
A good wipe with a microfibre cloth will remove any dust and/or smudges.
If you’re using real glass and want to make sure it is spotless, you can clean it with water and dish soap, followed by drying it with a clean dish towel. Wipe it off with a crumpled, clean newspaper or a clean microfibre cloth to remove any remaining dust.
After cleaning, it’s important to touch the glass on just one side!
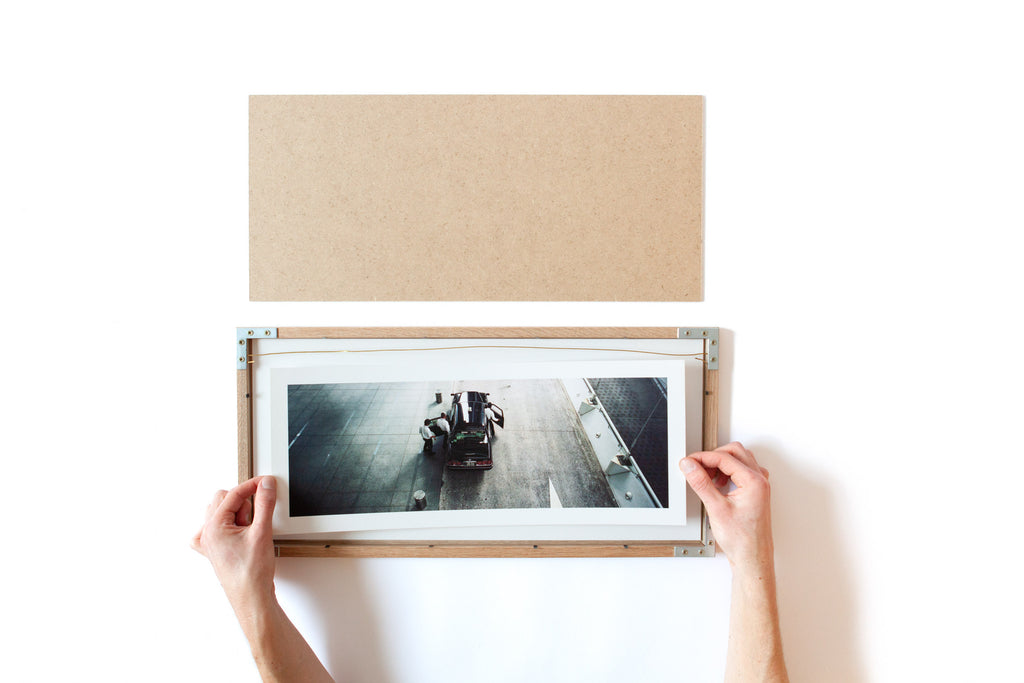
4. Put the print in the frame
The glass should be completely dry before assembling the layers in the frame.
First, lay in the glass, then your art (which is attached to the mat board). Stack the backing board on top of the art.
If you opted to use acrylic spacers, the glass is already in the frame before attaching the spacers. Then, you place the mounted art on it, making sure it lies on the spacers. As the art is already mounted on rigid material, a backing board may not be necessary.
5. Closing up the frame
How the back of the frame is sealed depends on the frame. Some frames have metal clasps or screws.
Or you could use pushpins, staples or nails to firmly close up the frame. Of course, you should be wary of the backing board when using these methods.
On some frames you can’t use any of these mechanisms. In that case, you can use long strips of (acid-free!) tape to hold the edges of the frame’s backing in place.

A final note
Congratulations, you have framed your art!
P.S. The materials you use for framing can make or break your art – quite literally. Always make sure you are using archival-quality materials that are acid-free. So acid-free tape, paper, backings, etc.